How to Rename a File in Windows 10
Learn three ways to rename a file in Windows 10: using File Explorer, the Command Line, and an application like WordPad
Introduction
Windows 10 provides multiple ways to rename files. This tutorial walks through three of them:
- Renaming a file from File Explorer
- Raniming a file from the Command Prompt
- Renaming a file using an application like WordPad
The concept of files is a metaphor derived from the world of paper-based file systems. A computer file is a container just like its paper-based namesake. Instead of holding data stored on paper pages, a computer file holds electronic data. And just like a paper-based file, a computer file can be labelled with a name to help identify its contents.
Prerequisites
To complete the steps in all three mini tutorials, you’ll need:
- a computer running Windows 10
- some experience using Windows to perform tasks like opening applications, browsing files and typing text using a keyboard
- an application like WordPad
If WordPad isn’t installed on your computer, you won’t be able to follow the tutorial step by step. However, the Save As and Save File As functions detailed in the third tutorial are standard functions found in many Windows applications.
Key Terms
- file
- a named container for collecting data on a computer, similiar to a paper-based file that holds papers
- file system
- comprises directories and files, provides visual organization of the computer’s storage system, similar to a file cabinet that stores files
- command prompt
- a text-based interface to enter commands to do things like renaming a file, also known as a command shell, command terminal and Windows Command Processor
Renaming a file from File Explorer
Step 1 – Open File Explorer
Use one of the following methods to open File Explorer:
- On your keyboard, press the Windows Key + E
- On the Windows taskbar, right click the Windows Start button, then from the menu choose File Explorer
 File Explorer with the navigation tree displayed in the left sidebar and the Search Tool displayed near the top right.
Step 2 – Find the file to rename
Use the left sidebar to navigate to the directory where the file is located. If you know the file name but aren’t sure where the file is located, type the file name into the Search Tool.
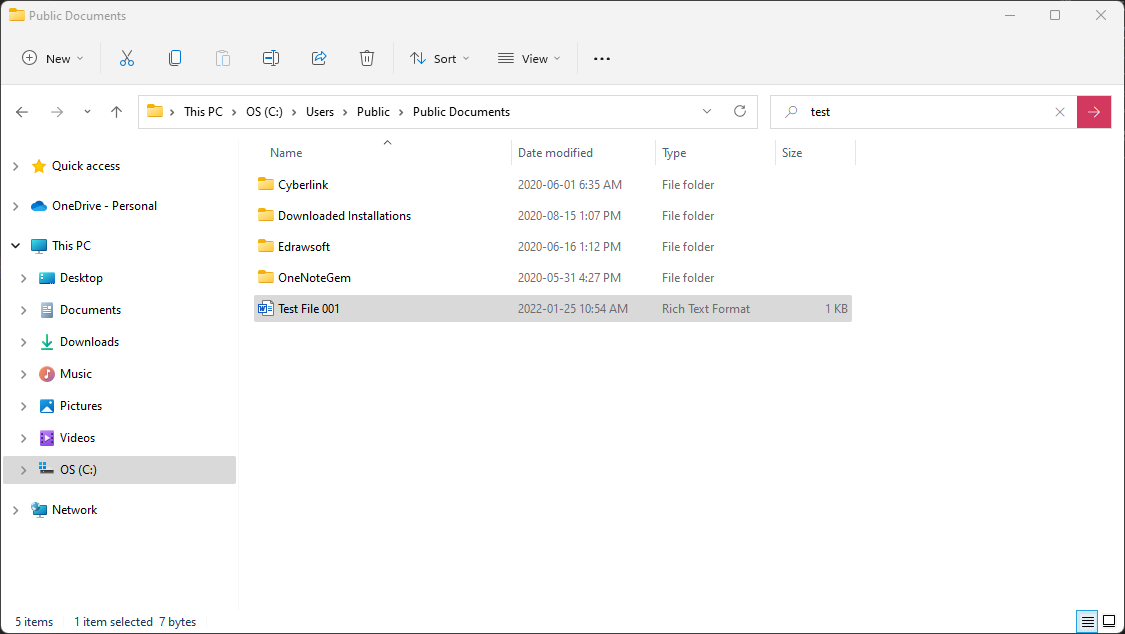
 Using the Search Tool in File Explorer to find a file that starts with “test”.
Learn more about using File Explorer Search Tool in the tutorial How to Search for Files Using the File Explorer Search Tool.
Step 3 – Rename the file
Once you’ve located the file, there are several ways to rename it:
Highlight the file and press the F2 key
- Click the file to highlight it
- Press the F2 key on your keyboard
- Type the new name into the text box
- Press the Enter key on your keyboard
Right click the file and click the rename button
- Right click the file name
- Click the Rename button
- Type in the new name
- Press the Enter key on your keyboard
Renaming a file using the Save As function of WordPad
Applications that run on Windows often provide an interface to browse the file system. You can use the interface to open a file and save it with a different name. WordPad provides this feature. Follow the steps below to open a file in WordPad and rename it.
Step 1 – Open WordPad
Step 2 – Click File > Open
Step 3 – Click File > Save As
Renaming a file from the command prompt
Windows provides a command line interface (CLI) named the Command Prompt. You can use the Command Prompt to rename a file. There are multiple ways to open a Command Prompt. This example describes one way.
Renaming a file doesn’t change the file type. For example, renaming a Word file that has a .docx extension with a .xlsx extension won’t convert the file from a Word file to an Excel file. Renaming a file only changes the file’s name, not its contents.
Step 1 - Press the Windows Key + R
Step 2 - Type cmd into the text box and press the Enter key
Step 3 -
Step 4 -
If you get an Access is denied error message, you don’t have sufficient privileges to rename the file.
